| * Leaf Math
|
* Seeking a symmetrical leaf
Collect a variety of leaves and compare them: which one is the most symmetrical? Is any leaf perfectly symmetrical?
Suggestions:
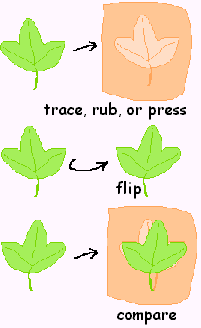
1) Record the leaf's shape using one of these methods:
a) Lay each leaf on a sheet of paper and trace around it with a pencil.
b) Make a crayon rubbing of each leaf by placing a piece of paper over it and rubbing gently with the side of a crayon.
c) Flatten a piece of clay with a rolling pin or bottle, then make a leaf imprint.
2) After you have preserved the shape of the leaf with one of the above methods, flip the leaf over and set it down onto its recorded shape. How well does it fit? The better the fit, the more symmetrical the leaf.
3) Another method of checking symmetry after transferring the leaf's shape to paper is to cut out the paper outline and fold it in half. How well do the edges match up?
|
 |
Variation:
- On graph paper, trace around one-half of a leaf, making sure that the stem points straight down. Remove the leaf. Try to draw the mirror image of this half-leaf to form a completely symmetrical leaf. Can you do it? If not, why not? If it's not symmetrical, make minor adjustments to both halves of the drawing until you can complete a symmetrical leaf.
* What's my size?
1) Estimate the surface area of a leaf based on graph paper units. If you have several leaves, or each student has one leaf, try to guess which leaf is the largest.
2) Lay each leaf on graph paper and trace around it or make a crayon rubbing.
3) Count the number of complete squares within the leaf outline. Work out a system for counting the partial squares, such as pairing up two partial squares whose combined areas are close to one square.
4) Compare the total number of squares to your estimate.
5 Rank-order the leaves by size.
Variation:
- Measure the length and width of each leaf and use these measurements to compare the leaves: Which is longest/shortest? widest/narrowest? Which has the largest/smallest ratio of length to width?
* What's my line?
Place a leaf on graph paper and trace around it. Try to determine a method for estimating the length of the leaf's "perimeter." (If the outline were stretched out to become a straight line, how long would it be?)
Suggestions:
1) Shape a length of thread or thin wire so that it roughly follows the shape of the leaf, then stretch it out and measure it.
2) Use the grid lines to estimate the length of each segment of the leaf's outline.
* Leaf weight-loss plan1) Weigh a small pile of freshly-gathered leaves which can flex without breaking.
2) Subtract out the weight of the container in which the leaves have been placed (if any).
3) Weigh the same pile of leaves each day for a week.
4) Graph the daily weight of the leaves.
Suggestions:
1) If you can't wait for nature to dry the leaves, you can crisp them by microwaving them on low heat until they break when folded.
2) Another fast-drying method is to iron the leaves on low heat, covered by a thin piece of cloth or several layers of newspaper.
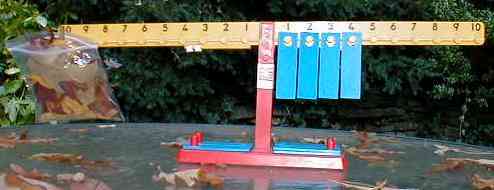
3) Use a kitchen scale or a balance scale. If you have a classroom number balance, you can hang a sandwich bag stuffed with leaves from the 10 peg on one side and balance it with number weights on the other side.

The plastic bag of leaves hanging from the 10 peg balances with four 10-gram weights hanging on the 1, 2, 3, and 4 pegs. 1 + 2 + 3 + 4 = 10. That means that the bag would also balance with one 10-gram weight hanging from the 10 peg. How much does the bag of leaves weigh?
Variations:
1) Separate the leaves by type. Weigh each type separately over a period of several days. Which type of leaf has the fastest/slowest weight loss? Make a line graph of your findings.
2) Calculate the weight loss as a percentage of the original weight.
 top top |
| * Spider Math
|
* Symmetrical spider
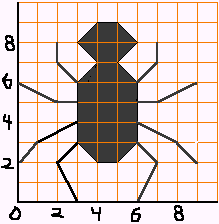
Using graph paper, draw a perfectly symmetrical spider.
Variations:
1) Draw one-half of a spider. Trade papers with a partner and see if you can complete each other's symmetrical spiders.
2) Coordinate geometry:
a)Near the bottom left edge of your graph paper, draw two lines which form an L. Number these lines, starting from 0 where they intersect.
b) Draw a simple symmetrical spider such that each line segment begins and ends at an intersection.
c) Make a list of the ordered pairs of coordinates so that the spider can be drawn by connecting the points in sequence. (Use a symbol to show where the pencil should be lifted between certain points.)
d) Trade lists with a partner. See if you can draw each other's spiders by following the list of ordered pairs, without peeking at the original drawings.
e) Compare the original spiders with those drawn from the lists of ordered pairs of coordinates. Are they identical? If not, double-check and revise the lists as needed.
|
 |
* How many legs?
1) Get a lot of plastic spiders, or draw simple spiders on small squares of paper. Give each small group a handful.
2) Discuss how to figure out how many spider legs there are on 2 spiders, or 3 spiders, or all of the spiders on the table.
3) Make a chart showing how many legs there are on one spider, two spiders, and so on. (For younger children, you might use a calculator to help.)
Variation:
- Using a 100 chart, circle each multiple of 8. Look for patterns on the grid. Look for patterns in the ones place digit and the tens place digit.
(These spider leg-counting ideas were shared by Jenny and Chris/CT/1 on the teachers.net primary elementary chatboard.)
* The math of making a spider web
1) Visit this page:
www.xs4all.nl/~ednieuw/Spiders/InfoNed/webthread.html
to see some fascinating close-up photos and learn some interesting math facts about a spider's spinners and the thickness, strength, elasticity, and quantity of its silk. You'll also see step-by-step diagrams showing how an orb web is made.
2) Make a poster or fact sheet on the math of making a spider web. (Use your own words!)
|
* Make a spider web
There are many types of spider webs, but for these activities, we'll focus on the most common type, the orb spider web.
1) Research orb spider webs. See the link under "The math of making a spider web," above, for step-by-step diagrams showing how an orb spider web is made, or visit the "Garden Spider" page at www.wellesley.edu/Activities/homepage/web/Species/aspidergarden.html for more information and a diagram labelling the parts of the orb web.
|
 |
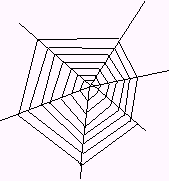
2) Using graph paper and ruler to guide you, design an orb spider web.
Variation:
- Look at pictures of different kinds of spider webs (orb, funnel,
sheet, scatter, triangle). Draw a web of your choice on graph paper. Find the area and the perimeter of your web. Decide what to do with half and
quarter squares.
(This idea was shared by Rheta Greenwood on the teachers.net primary elementary chatboard.)
Craft variations: Turn your graph-paper web into a web you can hang in a corner or a window!
1) a glittery web made of glue
a) Place a sheet of wax paper over your graph paper web. Squeeze thin lines of glue onto the wax paper, following the lines of your web.
b) If you like, you may sprinkle glitter onto the glue.
c) After the glue is dry, carefully peel it off of the wax paper and hang it up.
2) a web made of spaghetti
a) Cook a pot of spaghetti and drain it. (If you add a few drops of oil to the boiling water, the spaghetti won't stick together.)
b) In a bowl which you don't mind getting messy, mix together the spaghetti and enough glue to coat it.
c) Cover your graph paper web with wax paper. Lay strands of spaghetti on the wax paper, following the design of your web.
d) When the glue has dried, carefully peel the spaghetti web off of the wax paper and hang it up. (Both of these craft variations were adapted from ideas found at:
www.kinderkorner.com/spiders.html
where you'll find lots of other spider craft ideas and resources.
Kinder Korner's spaghetti web idea was shared by Tina of St. Louis.)
 top top |


